


MEET
JOANNA
Hi there! I'm Joanna Krueger and my husband Michael and I are a wedding photography team in Houston, TX. We hope you enjoy viewing our latest work and getting a peek into our lives!
sort by
category
weddings
engagement
bridals
personal
education
READ MORE...
looking for something in particular?
May 17, 2018
JK Education
Remember that day when you bought your first fancy DLSR camera, pulled it out of the box, took a photo and felt like a pro? I certainly remember that day! The day I graduated from my pocket friendly little point and shoot camera to the big, bicep workout DSLR camera. I wanted to instantly be able to take amazing pictures because after all..isn’t it the camera that makes good photos?? (Oh don’t even get me started!) Our camera’s are smart little computers but, believe it or not, we are smarter than our cameras. The settings we choose (and the light we find) determines how good our photos are- not what kind of camera we have.
When I first started into photography, I was instantly overwhelmed by all the letters on the dial and all the buttons on the back (and on the top!). There were buttons everywhere! Then turn on the menu, and there’s even more buttons!! I picked a random letter on the dial (because I really had no idea what they meant and I knew I wanted to avoid auto) and went to town. I was never really satisfied with the results I was getting and I knew it was because I had no idea how to set my camera to create the perfect exposure. I took a picture, adjusted a setting here, took another picture, adjusted a different setting there…it was a never ending cycle of uncertainty.
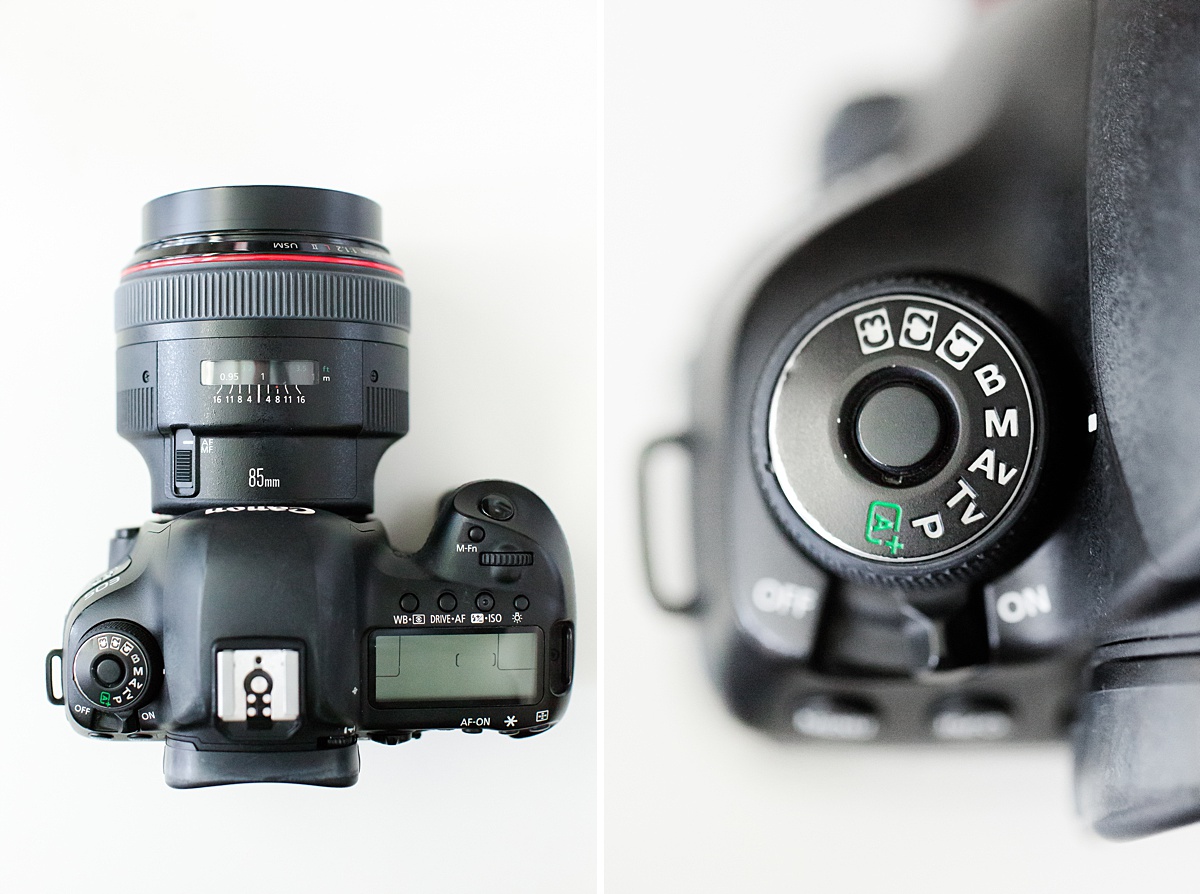
We get asked all the time what settings we use so I decided to create a blog post series that breaks down what goes in to choosing our camera settings! We’re starting with the basic exposure dial on top of the camera and in future blog posts, I’ll break down aperture, shutter speed, and the mysterious ISO!
A – Auto
Oooooh auto mode. Auto mode is the easiest mode of them all. When your camera is set to auto, you’re letting your camera make all your decisions for you. We personally don’t like this mode because we don’t get the results or style we’re looking for. For us, we love the bright and airy style with low apertures and auto will never give us those results. Auto mode also automatically determines what you want in focus. Generally, your camera chooses whatever is closest to the camera and automatically focuses on that. Trying to take a close up picture of your kid? Auto will most likely focus on the nose instead of the eyes because it’s closer to the camera. If you’re always wondering why your pictures aren’t in focus, it’s most likely because you’re in auto mode. Since we don’t always focus on what’s closest to the camera, auto is a no go for us.
P – Program
Program mode is a baby step above Auto mode. Your camera automatically chooses settings for you (based on the available light) but you have the option to manually override any of the settings you’d like. If you’re already using Auto mode but want to get out of it but are too afraid of manual, this is a great place to go! Let your camera choose its settings but adjust one or more of them to see what happens.
A or Av – Aperture Priority
Aperture Priority mode means you choose the aperture, and the camera chooses the rest of the settings it thinks is best based off of the aperture you choose. We tend to stay away from this mode because we don’t like our camera making decisions for us. Our camera’s don’t know what kind of style or look we’re going for so we generally don’t like the results we get from Aperture priority mode. However, this can be a handy mode when you’re in a hurry to get a photo and don’t have time to get the perfect settings. Just set your desired aperture, and boom! Done.
S or Tv – Shutter Speed Priority
This mode is just like Aperture Priority mode except that instead of choosing the desired aperture, you’re choosing the desired shutter speed. Once you choose your shutter speed, the camera automatically sets the rest of the camera settings for you. This mode can come in handy if you need to take a photo with a super fast shutter speed (for sports or action shots) so you know what shutter you need. Or on the other hand, you want to take a photo with a long shutter speed at night time or you’re trying to create a cool motion blur effect. Either way, if you’re priority is your shutter speed, this is the mode for you!
B – Bulb
Bulb is an interesting function and I would never use it at a wedding or in general, everyday photography. The Bulb function is meant to be used when your cameras settings are set with an intervalometer (a.k.a. a really fancy/ high tech shutter speed manipulator and timer). In this function, you can attach an intervalometer to your camera and set it up to take a photo every certain amount of seconds or minutes. This is what photographers use to create those really cool time lapses with pictures. You can also use intervalometers to lengthen your shutter speed longer than the 30 seconds you camera can go up to on manual mode. This is what photographers use for astrophotography to capture those incredible Milky Way Galaxy shots and star trail time lapse photos. By attaching an intervalometer to their camera, they can adjust their shutter speed as long as they need to to get those amazing night sky photos. Just for fun, do a Google search for astrophotography. It’s really cool!
M – Manual
Oh manual mode! It’s scary, overwhelming, and so many people stay away from it because they just don’t really understand it. I get it. I was totally that person at one time! This is the setting that we use 100% of the time. Manual Mode means that you have complete control over everything. You choose your aperture, shutter speed, and ISO (we’ll get into what those mean in a future post). You can even go so far as choosing your own White Balance (how cool or warm your images are) using Kelvin temperature numbers. It can be challenging to learn how to use Manual Mode but once you do, you’ll never go back!! Trust me when I say, it’s WORTH it!! Manual mode is how we get the light and airy style we’re known for. We just can’t get the same results by using any other camera setting. By being able to choose lower apertures, we get those dreamy, creamy portraits.
post date:

JK Education
Remember that day when you bought your first fancy DLSR camera, pulled it out of the box, took a photo and felt like a pro? I certainly remember that day! The day I graduated from my pocket friendly little point and shoot camera to the big, bicep workout DSLR camera. I wanted to instantly be able to take amazing pictures because after all..isn’t it the camera that makes good photos?? (Oh don’t even get me started!) Our camera’s are smart little computers but, believe it or not, we are smarter than our cameras. The settings we choose (and the light we find) determines how good our photos are- not what kind of camera we have.
When I first started into photography, I was instantly overwhelmed by all the letters on the dial and all the buttons on the back (and on the top!). There were buttons everywhere! Then turn on the menu, and there’s even more buttons!! I picked a random letter on the dial (because I really had no idea what they meant and I knew I wanted to avoid auto) and went to town. I was never really satisfied with the results I was getting and I knew it was because I had no idea how to set my camera to create the perfect exposure. I took a picture, adjusted a setting here, took another picture, adjusted a different setting there…it was a never ending cycle of uncertainty.
We get asked all the time what settings we use so I decided to create a blog post series that breaks down what goes in to choosing our camera settings! We’re starting with the basic exposure dial on top of the camera and in future blog posts, I’ll break down aperture, shutter speed, and the mysterious ISO!
A – Auto
Oooooh auto mode. Auto mode is the easiest mode of them all. When your camera is set to auto, you’re letting your camera make all your decisions for you. We personally don’t like this mode because we don’t get the results or style we’re looking for. For us, we love the bright and airy style with low apertures and auto will never give us those results. Auto mode also automatically determines what you want in focus. Generally, your camera chooses whatever is closest to the camera and automatically focuses on that. Trying to take a close up picture of your kid? Auto will most likely focus on the nose instead of the eyes because it’s closer to the camera. If you’re always wondering why your pictures aren’t in focus, it’s most likely because you’re in auto mode. Since we don’t always focus on what’s closest to the camera, auto is a no go for us.
P – Program
Program mode is a baby step above Auto mode. Your camera automatically chooses settings for you (based on the available light) but you have the option to manually override any of the settings you’d like. If you’re already using Auto mode but want to get out of it but are too afraid of manual, this is a great place to go! Let your camera choose its settings but adjust one or more of them to see what happens.
A or Av – Aperture Priority
Aperture Priority mode means you choose the aperture, and the camera chooses the rest of the settings it thinks is best based off of the aperture you choose. We tend to stay away from this mode because we don’t like our camera making decisions for us. Our camera’s don’t know what kind of style or look we’re going for so we generally don’t like the results we get from Aperture priority mode. However, this can be a handy mode when you’re in a hurry to get a photo and don’t have time to get the perfect settings. Just set your desired aperture, and boom! Done.
S or Tv – Shutter Speed Priority
This mode is just like Aperture Priority mode except that instead of choosing the desired aperture, you’re choosing the desired shutter speed. Once you choose your shutter speed, the camera automatically sets the rest of the camera settings for you. This mode can come in handy if you need to take a photo with a super fast shutter speed (for sports or action shots) so you know what shutter you need. Or on the other hand, you want to take a photo with a long shutter speed at night time or you’re trying to create a cool motion blur effect. Either way, if you’re priority is your shutter speed, this is the mode for you!
B – Bulb
Bulb is an interesting function and I would never use it at a wedding or in general, everyday photography. The Bulb function is meant to be used when your cameras settings are set with an intervalometer (a.k.a. a really fancy/ high tech shutter speed manipulator and timer). In this function, you can attach an intervalometer to your camera and set it up to take a photo every certain amount of seconds or minutes. This is what photographers use to create those really cool time lapses with pictures. You can also use intervalometers to lengthen your shutter speed longer than the 30 seconds you camera can go up to on manual mode. This is what photographers use for astrophotography to capture those incredible Milky Way Galaxy shots and star trail time lapse photos. By attaching an intervalometer to their camera, they can adjust their shutter speed as long as they need to to get those amazing night sky photos. Just for fun, do a Google search for astrophotography. It’s really cool!
M – Manual
Oh manual mode! It’s scary, overwhelming, and so many people stay away from it because they just don’t really understand it. I get it. I was totally that person at one time! This is the setting that we use 100% of the time. Manual Mode means that you have complete control over everything. You choose your aperture, shutter speed, and ISO (we’ll get into what those mean in a future post). You can even go so far as choosing your own White Balance (how cool or warm your images are) using Kelvin temperature numbers. It can be challenging to learn how to use Manual Mode but once you do, you’ll never go back!! Trust me when I say, it’s WORTH it!! Manual mode is how we get the light and airy style we’re known for. We just can’t get the same results by using any other camera setting. By being able to choose lower apertures, we get those dreamy, creamy portraits.
weddings
engagement
bridals
personal
education

- Joanna
thanks for reading!
sort by
category
weddings
engagement
bridals
personal
education


Copyright 2026 Joanna Krueger

X Close comments