


MEET
JOANNA
Hi there! I'm Joanna Krueger and my husband Michael and I are a wedding photography team in Houston, TX. We hope you enjoy viewing our latest work and getting a peek into our lives!
sort by
category
weddings
engagement
bridals
personal
education
READ MORE...
looking for something in particular?
January 29, 2019
Our Bathroom Renovation – Before & After
You guys….. the bathroom renovation saga has FINALLY ended!! After a year and a half (that’s right…a year and a half) we finally finished our bathroom!! When we were touring our house for the first time, we loved so much about it but we hated the bathroom. We were standing in the bathroom with our realtor already discussing how much it would cost to renovate it. We knew when we bought the house that we would save up money and one day renovate the space. We lived with the original bathroom for two years and started making mental notes of what we wanted in our future, renovated bathroom. We ultimately decided to knock down the wall, take out the bathtub and shower stall and make a giant, walk in, spa inspired shower.
When we first started this project, we had no idea it would take as long as it did. There were so many things that slowed us down..hurricane Harvey, traveling, Michael working on the weekdays and shooting weddings with me on the weekends, the sheer size of the project and needing to research to learn how to do things…the list goes on!
I still can’t believe what we did and how much we have learned through this entire process. Here’s a quick breakdown:
- We knocked down the wall between the tub and shower.
- We gutted the bathroom to the studs and concrete floor. I don’t know what they used to put that tile down, but we just about destroyed the slab to remove the old tile.
- We moved the shower head from one side of the bathroom to the other.
- We did all our own plumbing! Michael raised the bathtub pipes higher for the new shower head and capped off the old shower head pipes.
- We moved the drain an inch or two closer to the wall so the linear drain would be centered in the shower.
- We built a curb out of 2×4’s anchored to the slab.
- We sloped the window shelf and the curb so water would drain off.
- We shaved down parts of the studs to make the wall perfectly flat (well, almost perfectly flat) for tile.
- We covered the walls in HardieBacker board. Whew! That was a lot of scoring and snapping.
- We made our own shower floor with deck mud and sloped it a quarter of an inch per foot. This was by far the most physical part of the entire process.
- We leveled using self-leveling compound and Ardex to flatten the floor and installed our own tile.
- We rerouted wires to make room for the his and hers shower niches.
- We covered all surfaces in the shower and curb with HydroBan to waterproof our shower.
- We installed a new toilet over ten times because it kept leaking. Turned out, the toilet was cracked on the bottom, and we had installed it correctly all along.
- We installed the new vanity and did all the plumbing ourselves!
- We installed new base boards and accidentally used unpaintable, silicone caulk. After several different attempts at scraping it off, we had to rip them up and redo all the baseboards and door trim.
- We saved a lot of money by using cut down plywood instead of real shiplap! When we installed them, a nail went through a water pipe, and we had to open the wall on the other side for emergency pipe surgery.
- We recut so many tiles that just broke out of line at the end of the cut.
- We did more math than I ever have in my entire life to make sure everything was just right.
- There are probably over a hundred things I’m leaving off because this project was SO big!
- We put blood, sweat and tears in this project and we couldn’t feel more proud of our hard work!
- We saved thousands of dollars by doing everything ourselves!
You might wonder, “How did you figure it all out?” Well, there were many useful resources. To name a few:
- johnbridge.com for tiling and shower building information
- terrylove.com for tips on plumbing
- youtube has so many helpful videos; it’s where Michael learned to sweat copper pipes, tile, grout and more.
- floorelf.com for more tile, linear drain, waterproofing, and niche-building how-tos
- Aaron Robichaud, a friend of Michael’s, who has made a successful living flipping houses – THANK YOU SO MUCH FOR ANSWERING ALL OF OUR MILLIONS OF QUESTIONS!
But now for the part you’ve all been waiting for. The before and after photos!!!
BEFORE
These are the photos by the seller from our house listing.
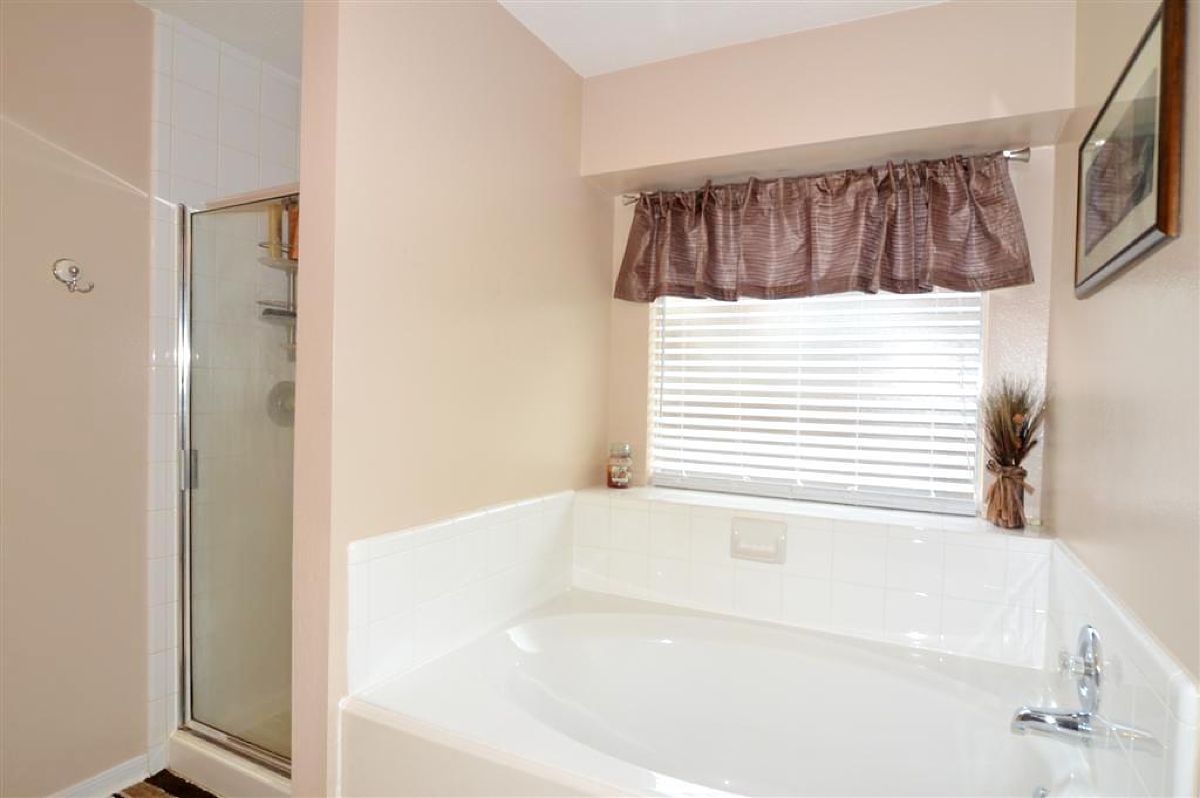

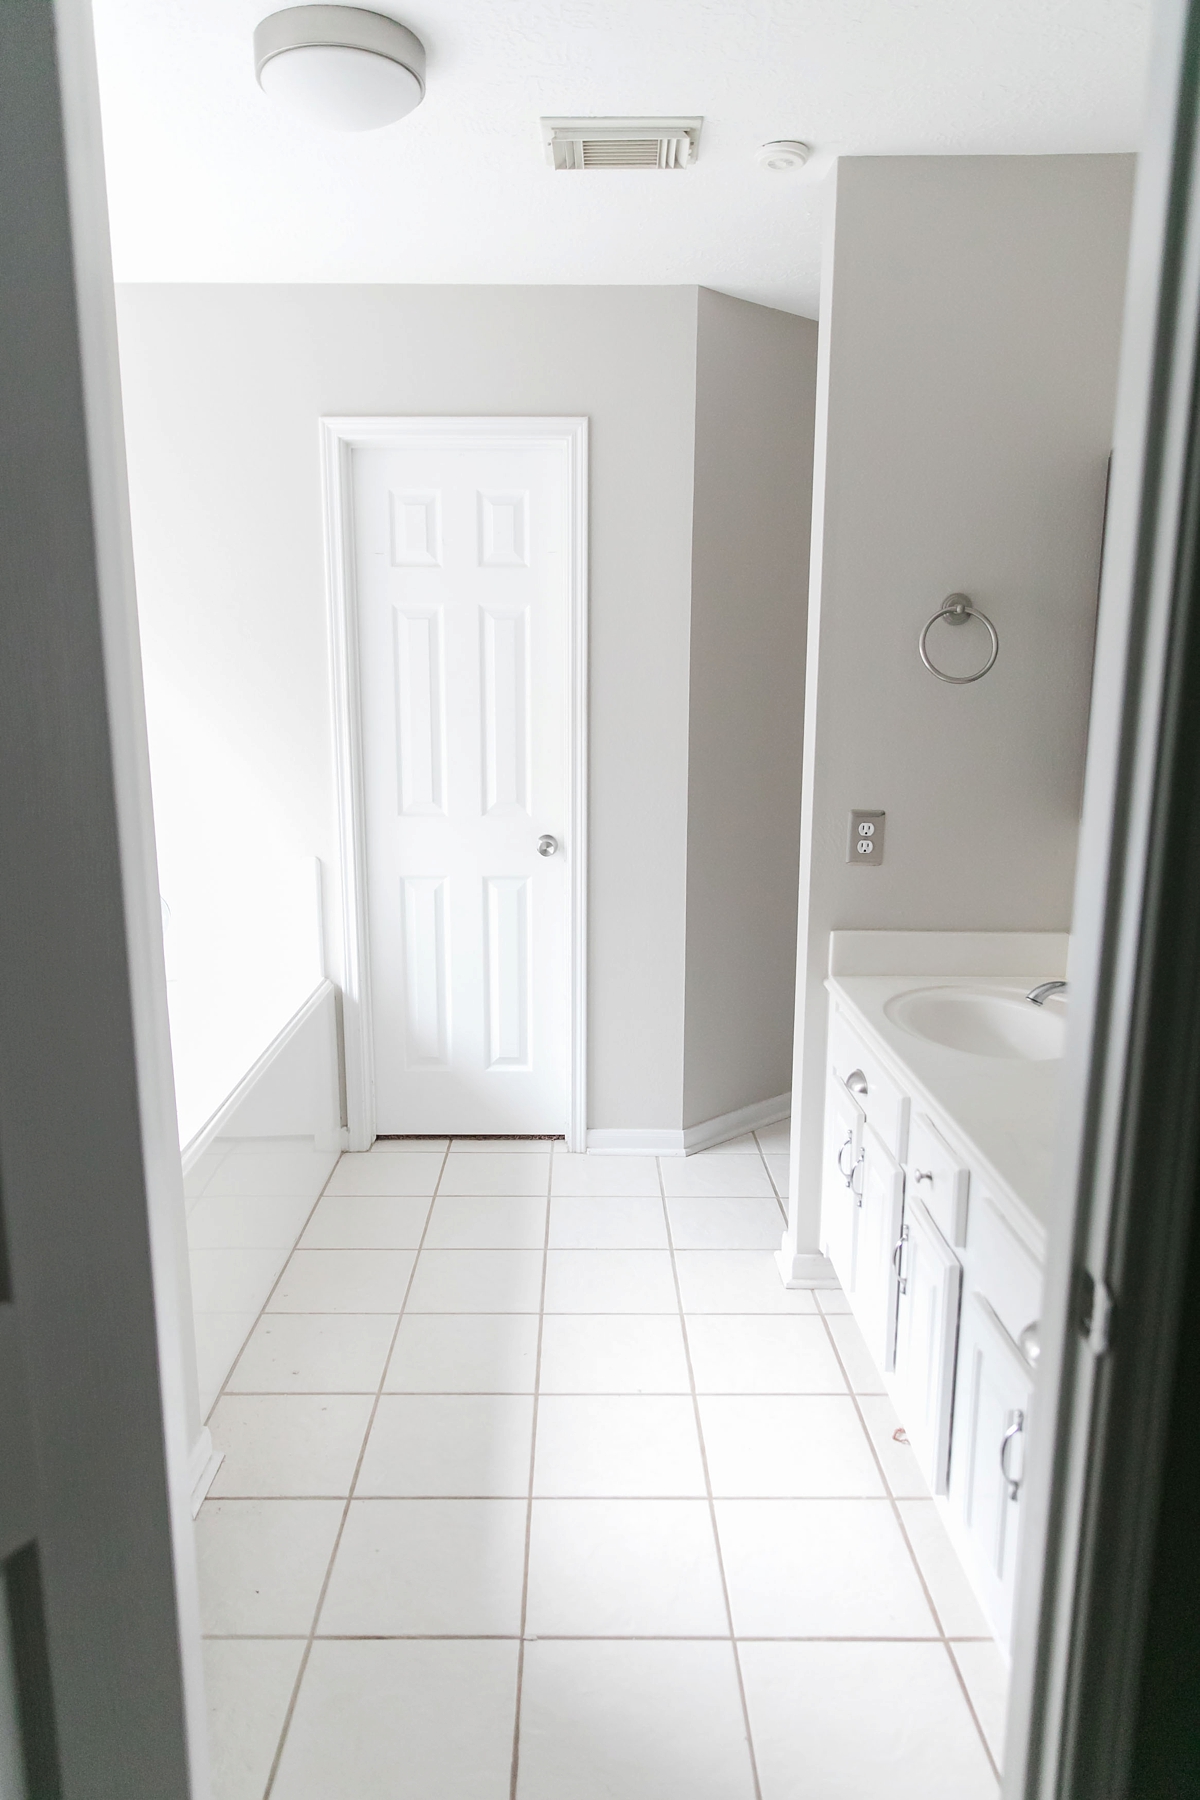
(These are our photos) Our bathroom had a shower, tub combo, The shower was tiny (and gross), and we never used the tub! It was just a lot of wasted space.
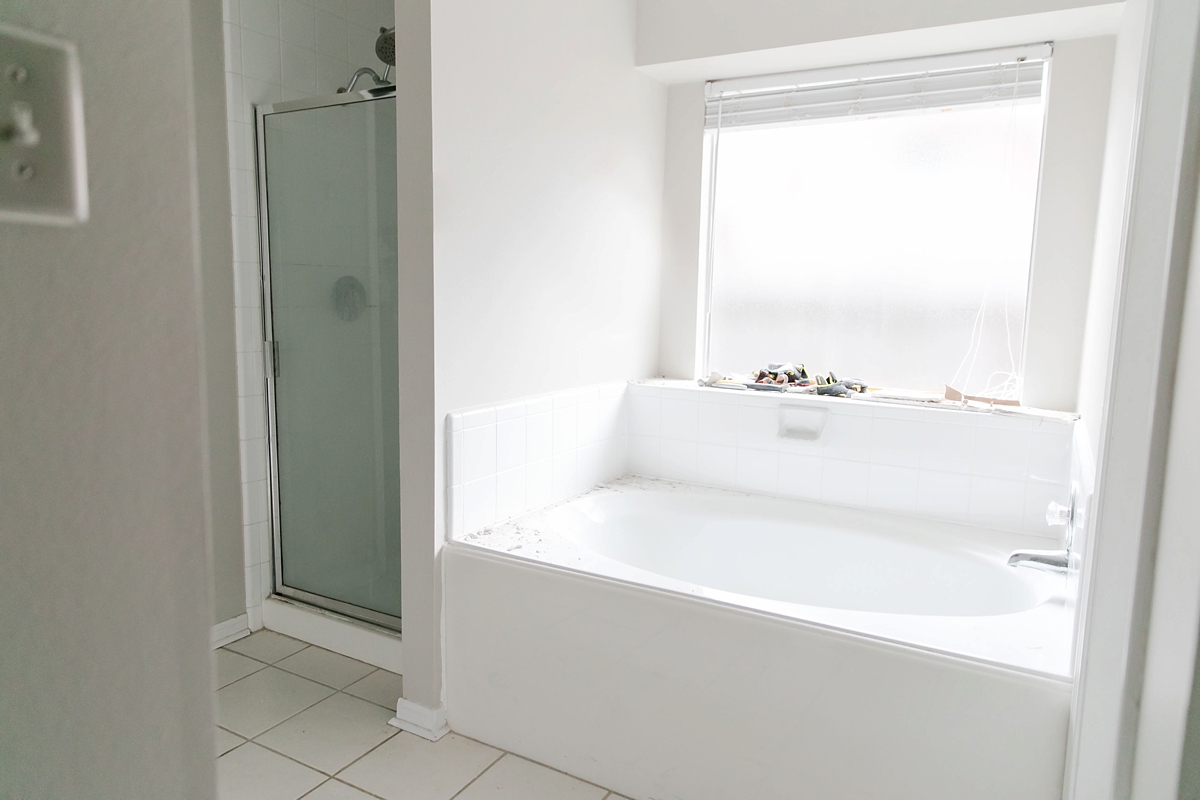
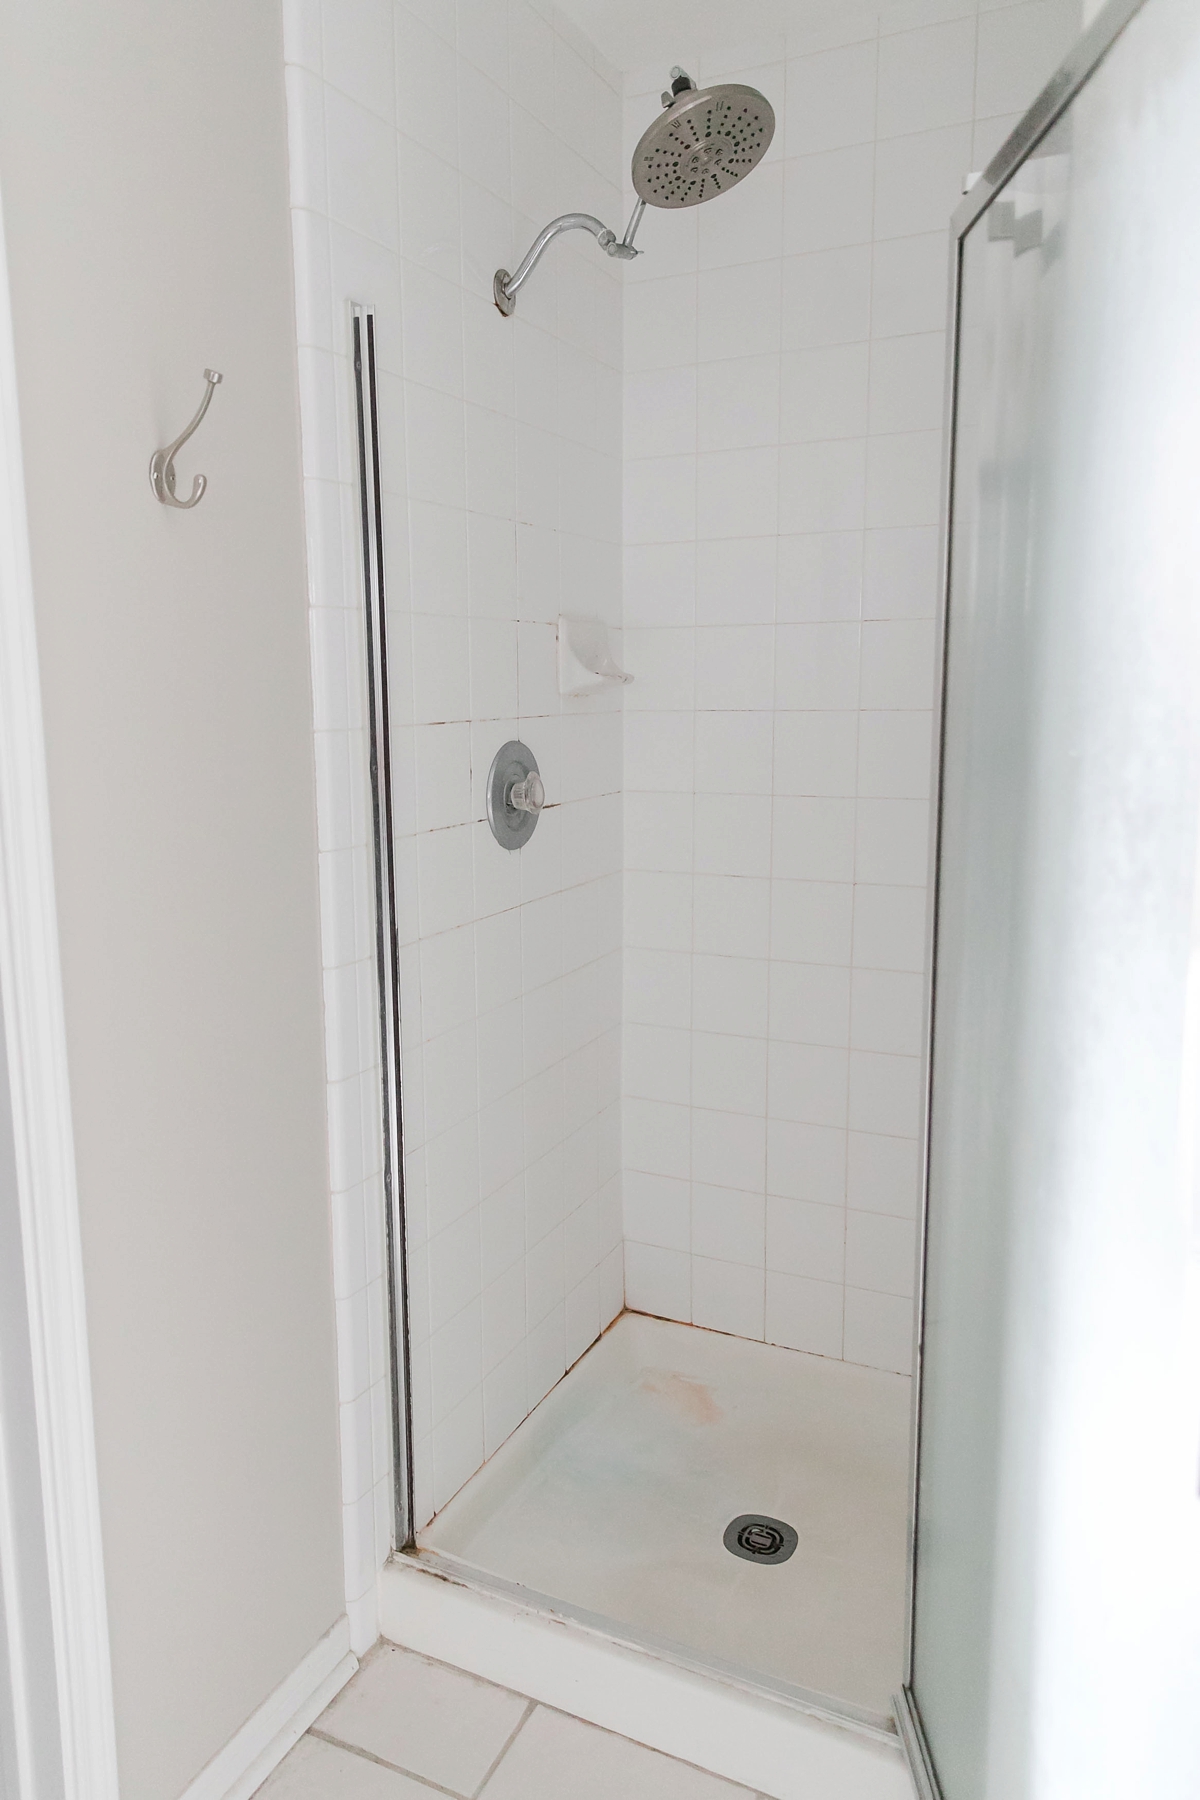
This shower. It was tiny, the shower head was way too low for Micheal and no matter how hard we scrubbed, the floor always looked like this.
We hated this vanity. It was really low and there was virtually no storage underneath because the doors were so narrow. Also, during demo, we discovered that the tile right in front of the vanity wasn’t even glued down. I literally just picked it up.
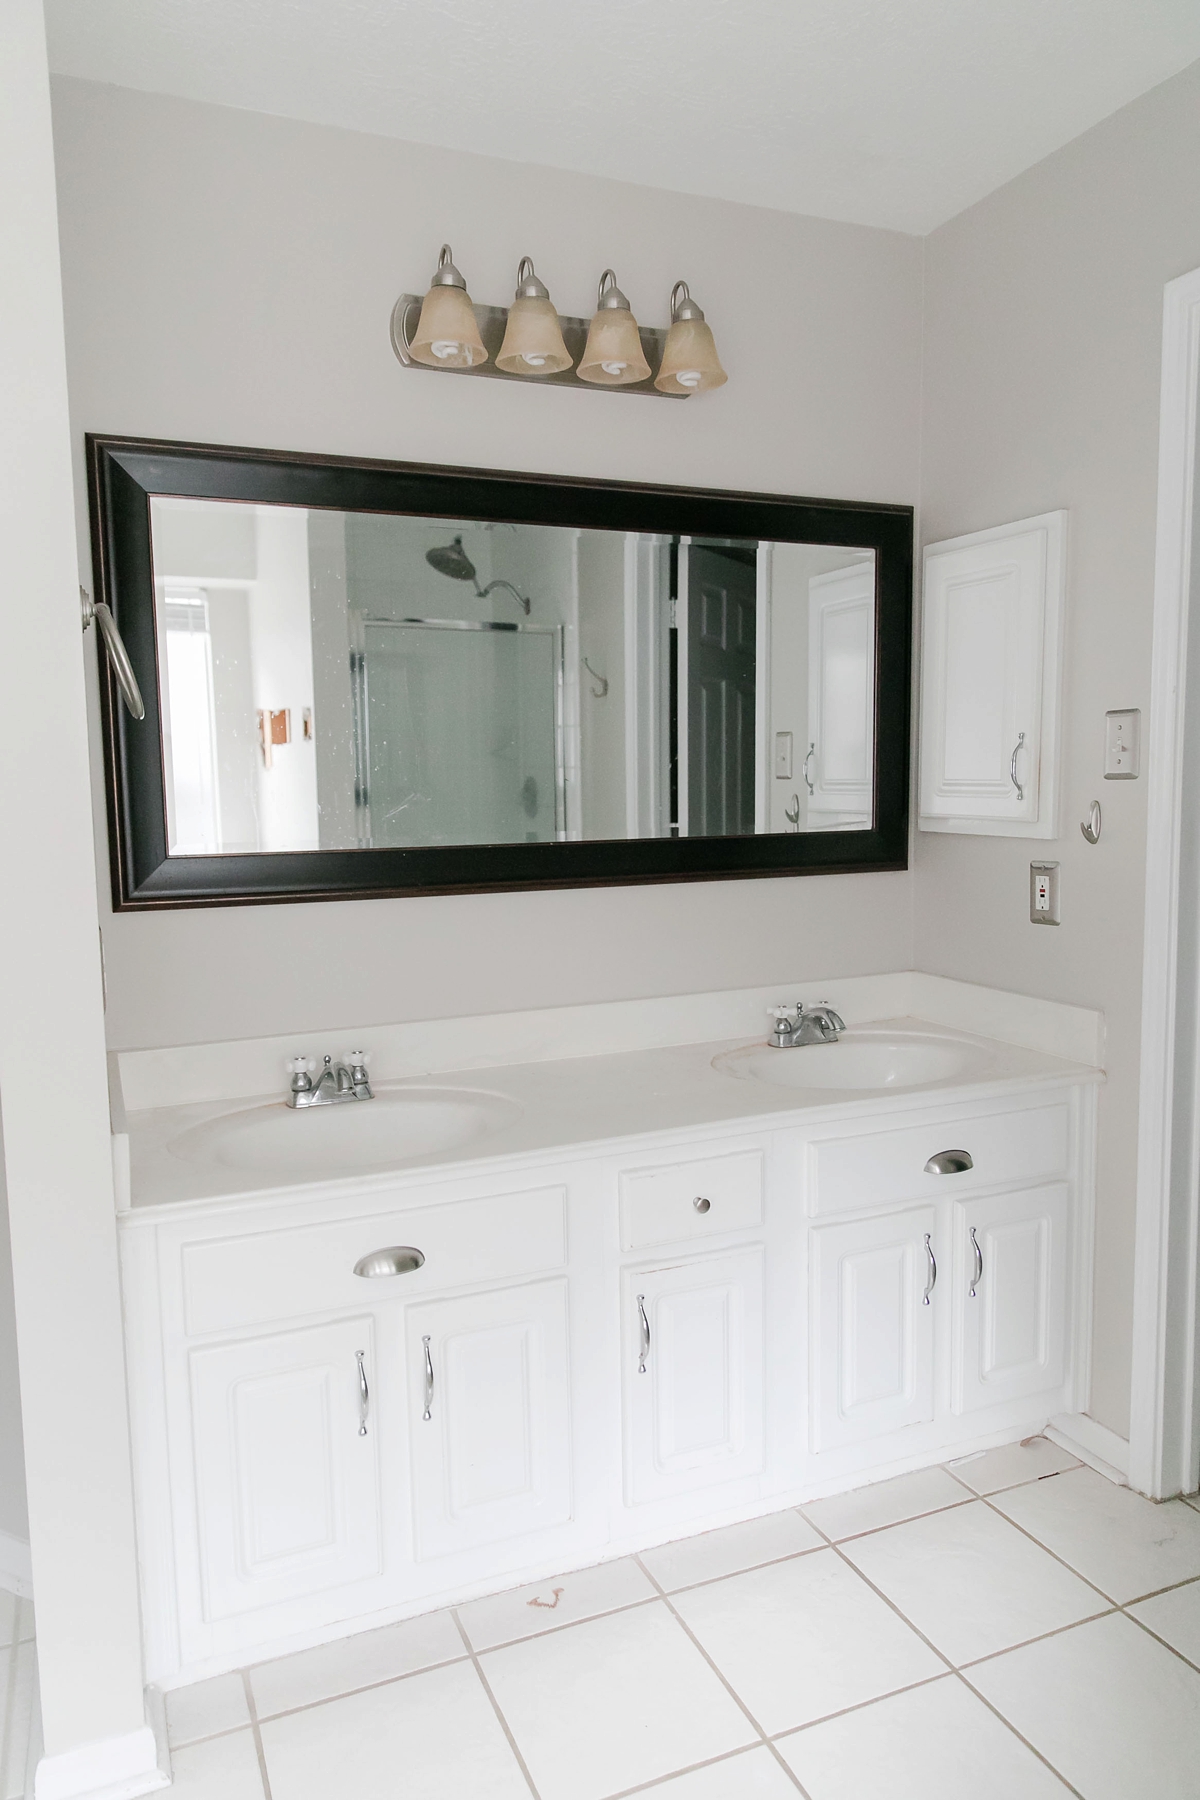
This tile was just all around horrible and was incredibly slippery! I slipped and fell several times just walking across the bathroom to the closet even while wearing shoes! It was very therapeutic smashing it up during demo!
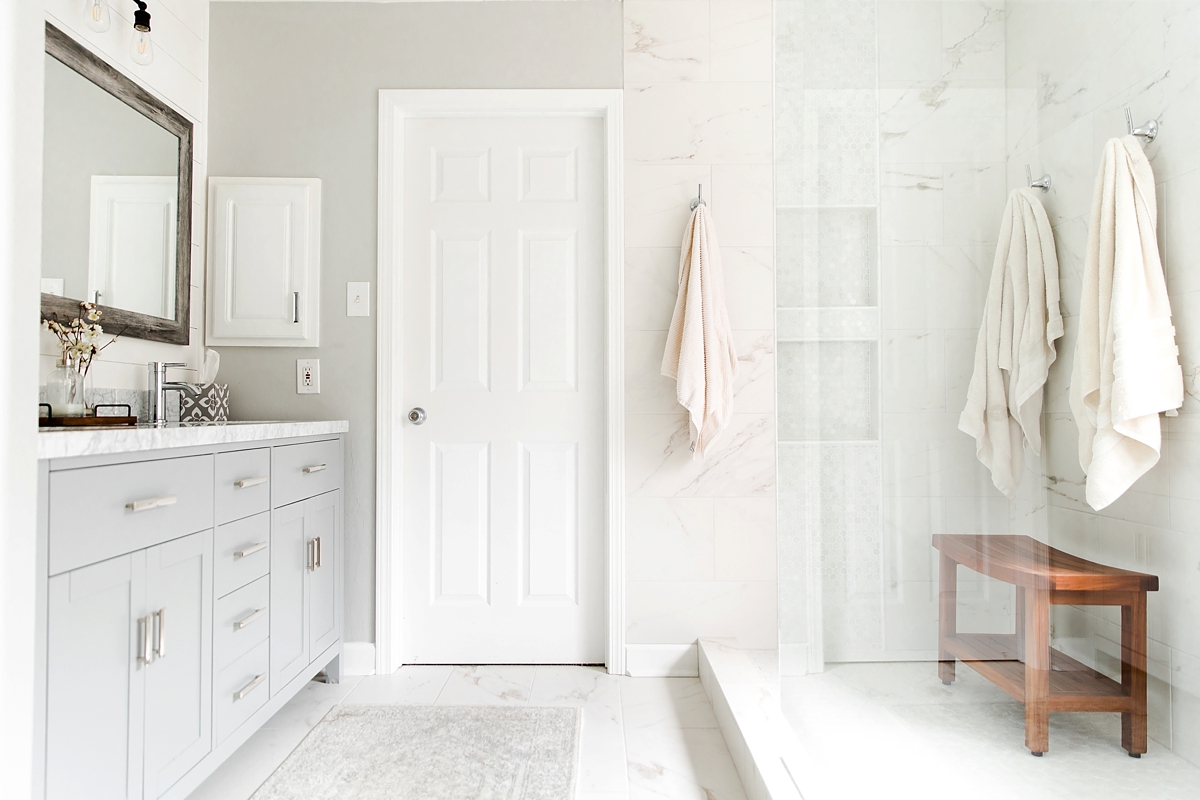
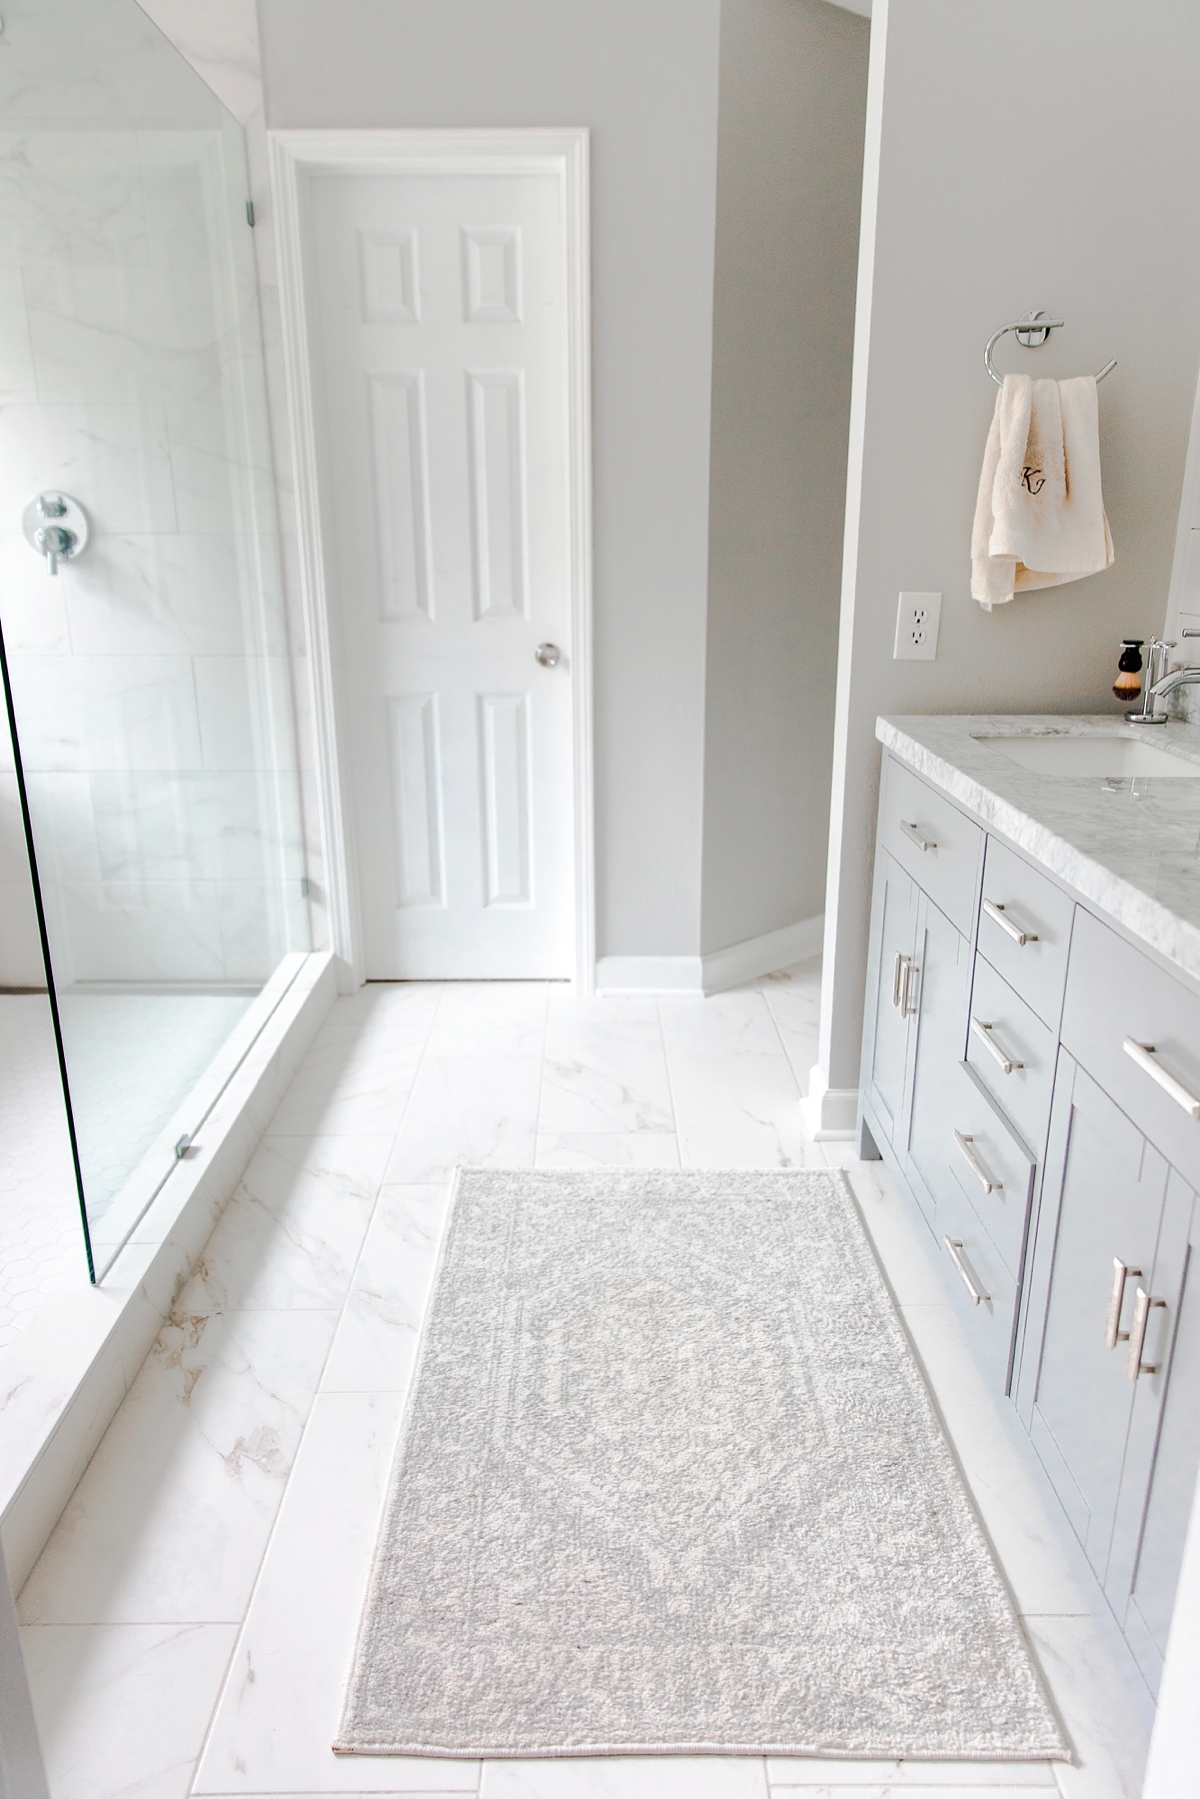
AFTER
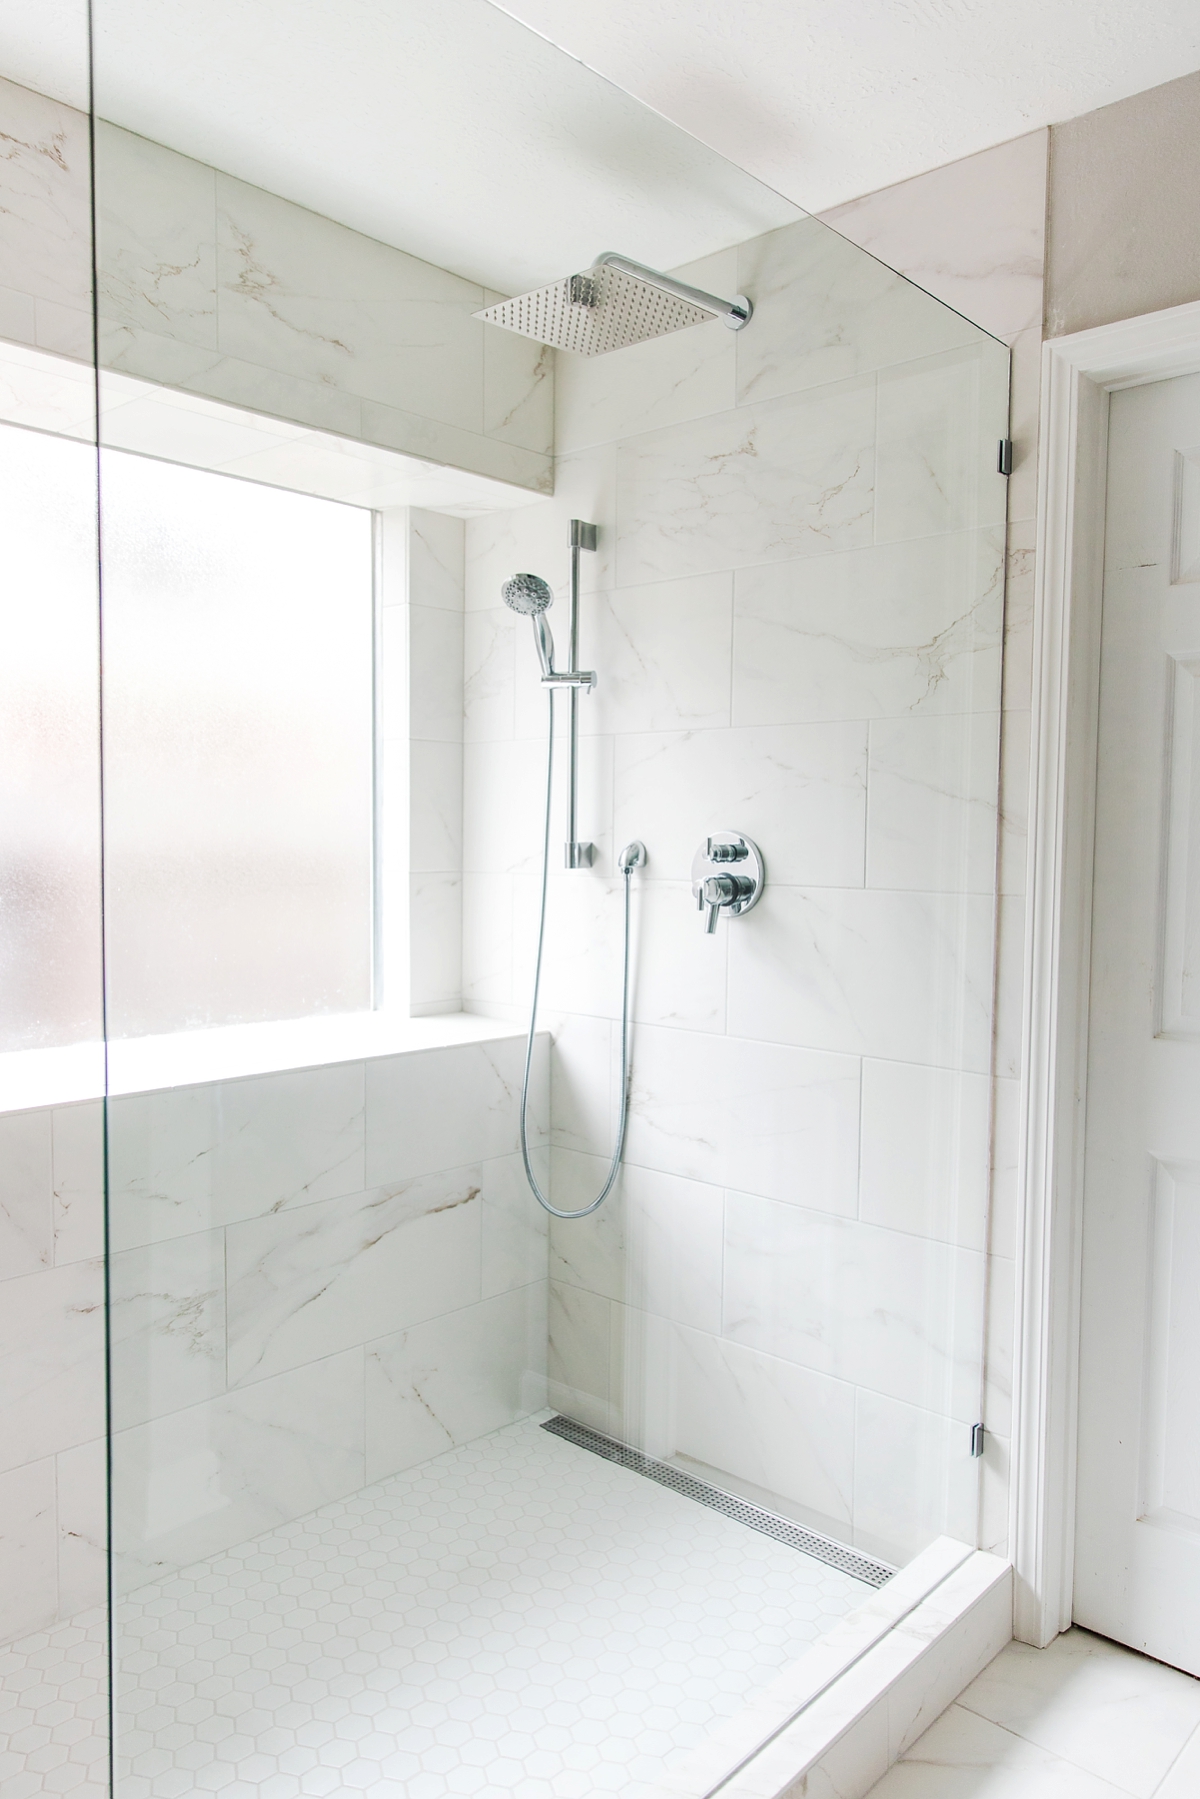
We are in LOVE with our new bathroom! Everything about it is just what we dreamed of. We took our nasty, twenty year old bathroom and turned it into a spa retreat! We love this room so much!
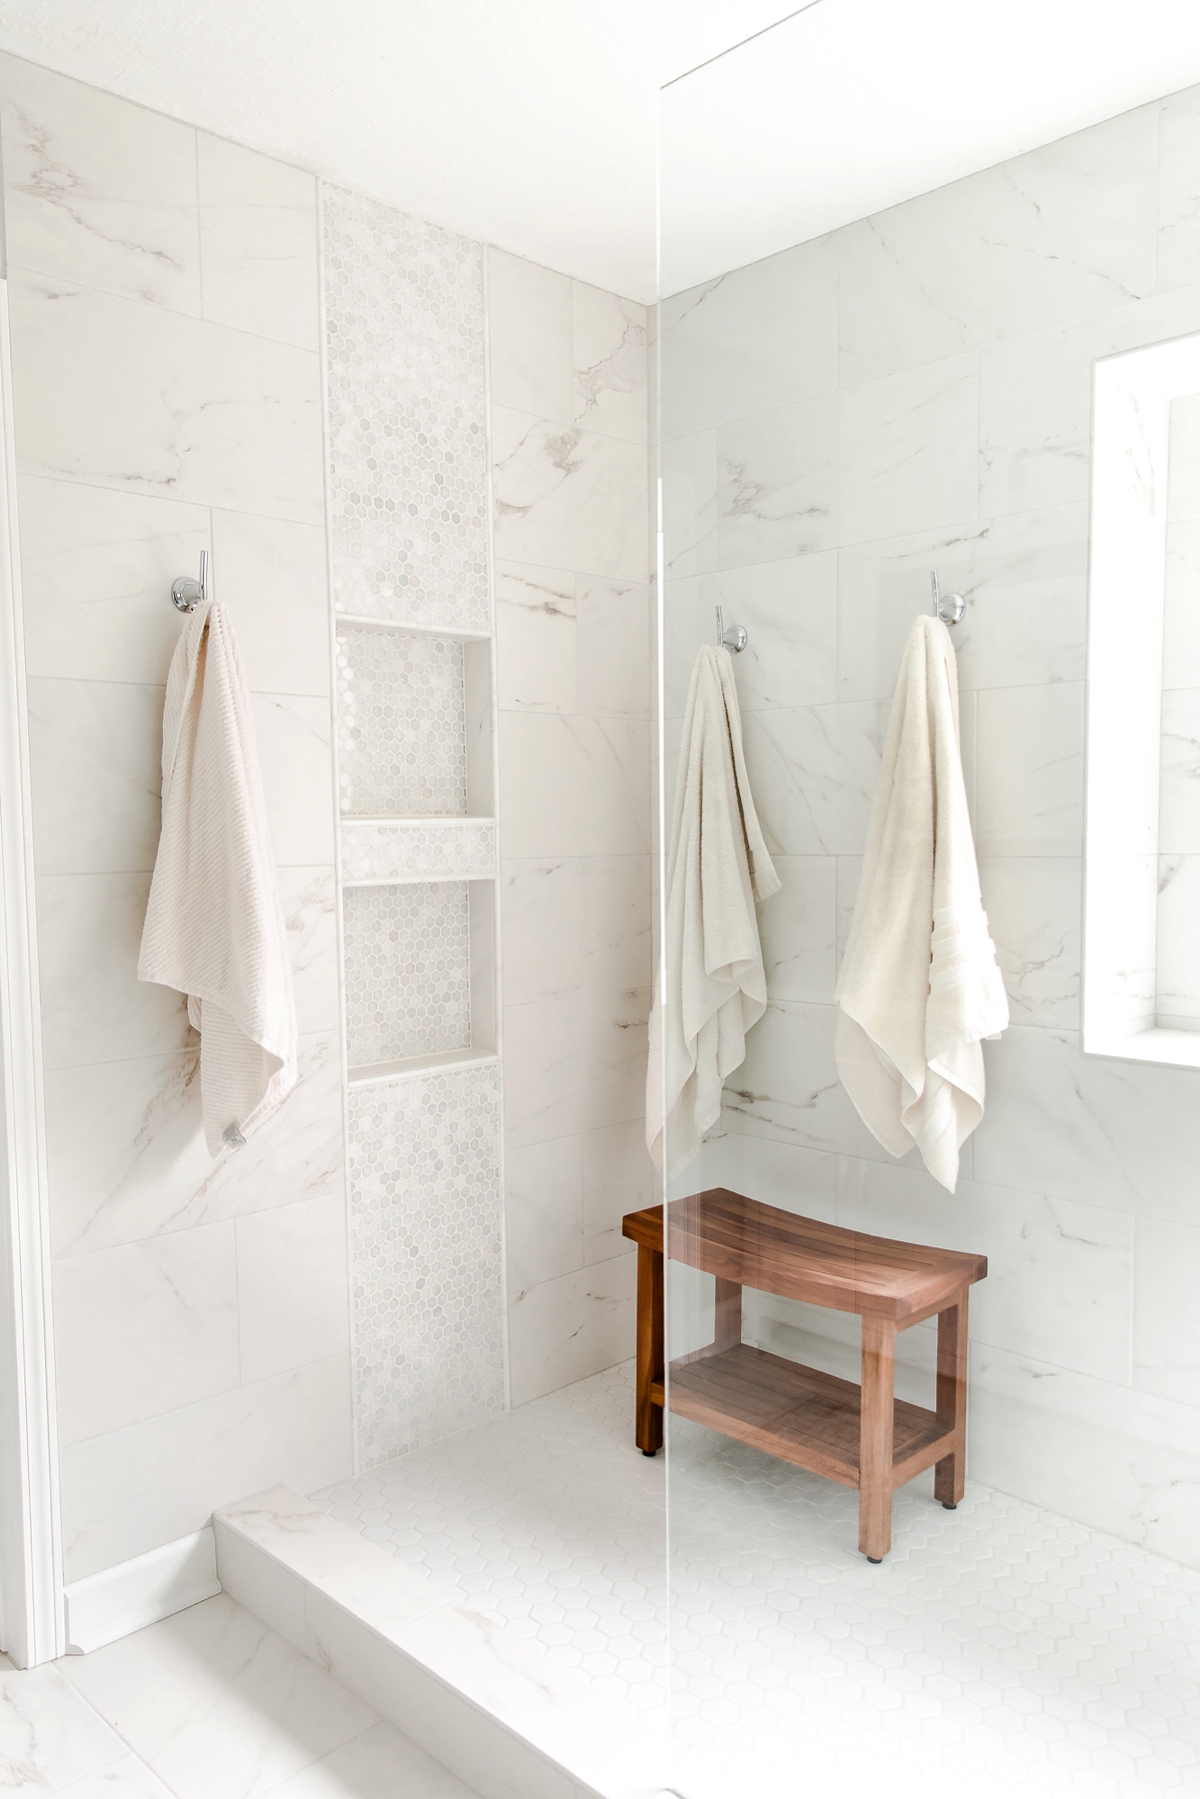
This marble accent tile stripe was Michael’s idea!
This corner under the window is where the bathtub used to be.

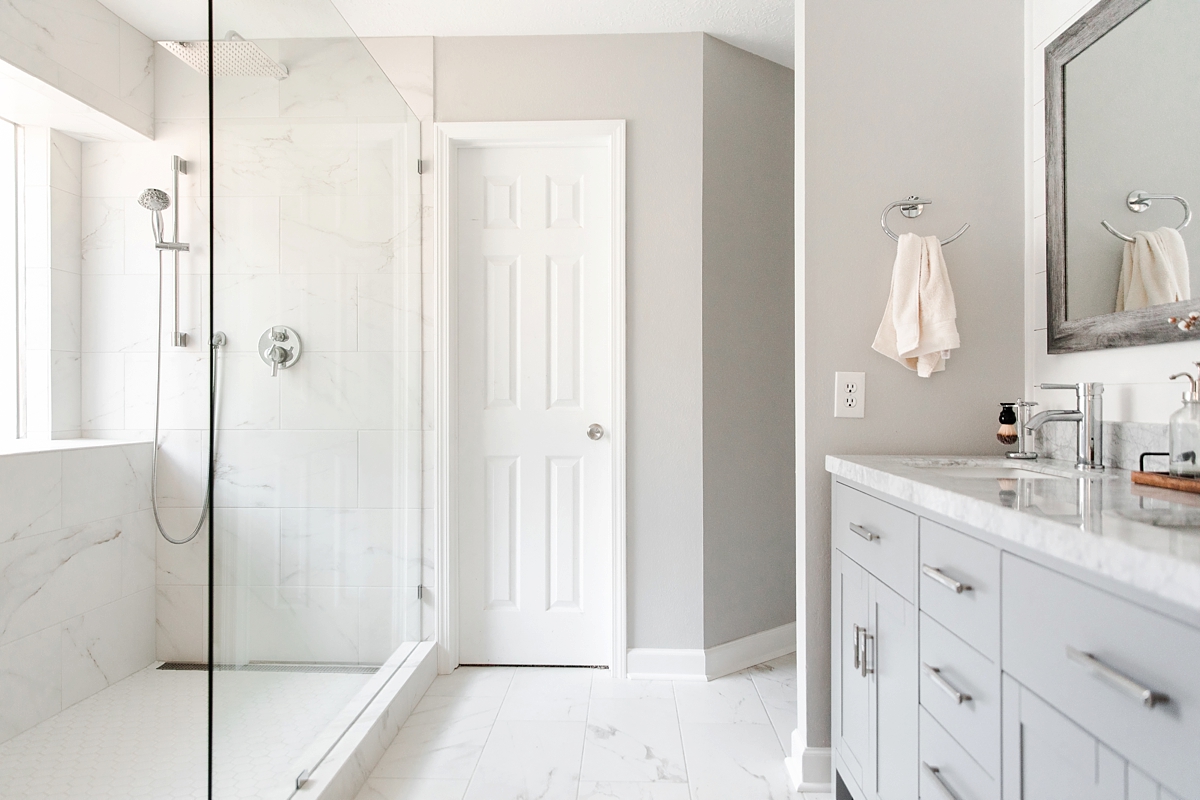
Michael chose the height of the shower head. He literally just held it above his head, and then marked the wall where he wanted it to go.
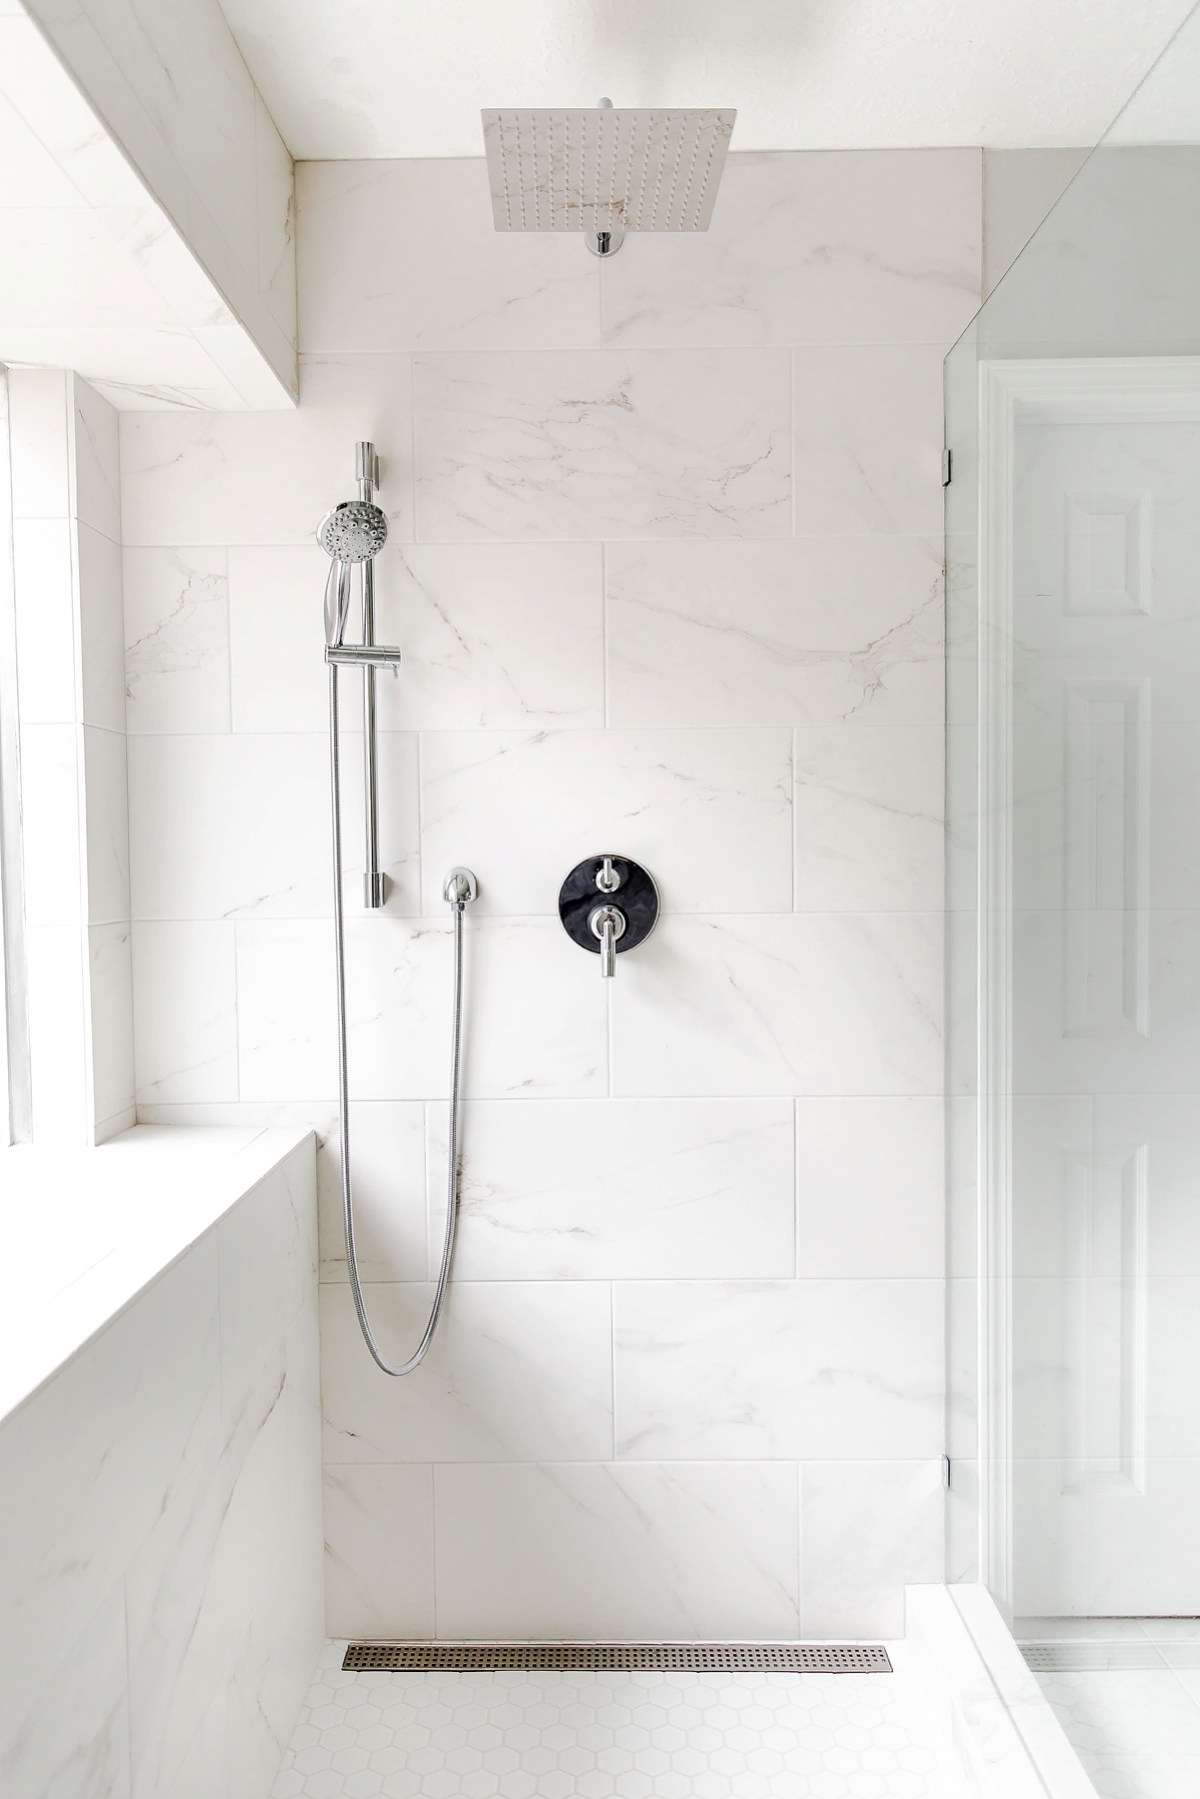
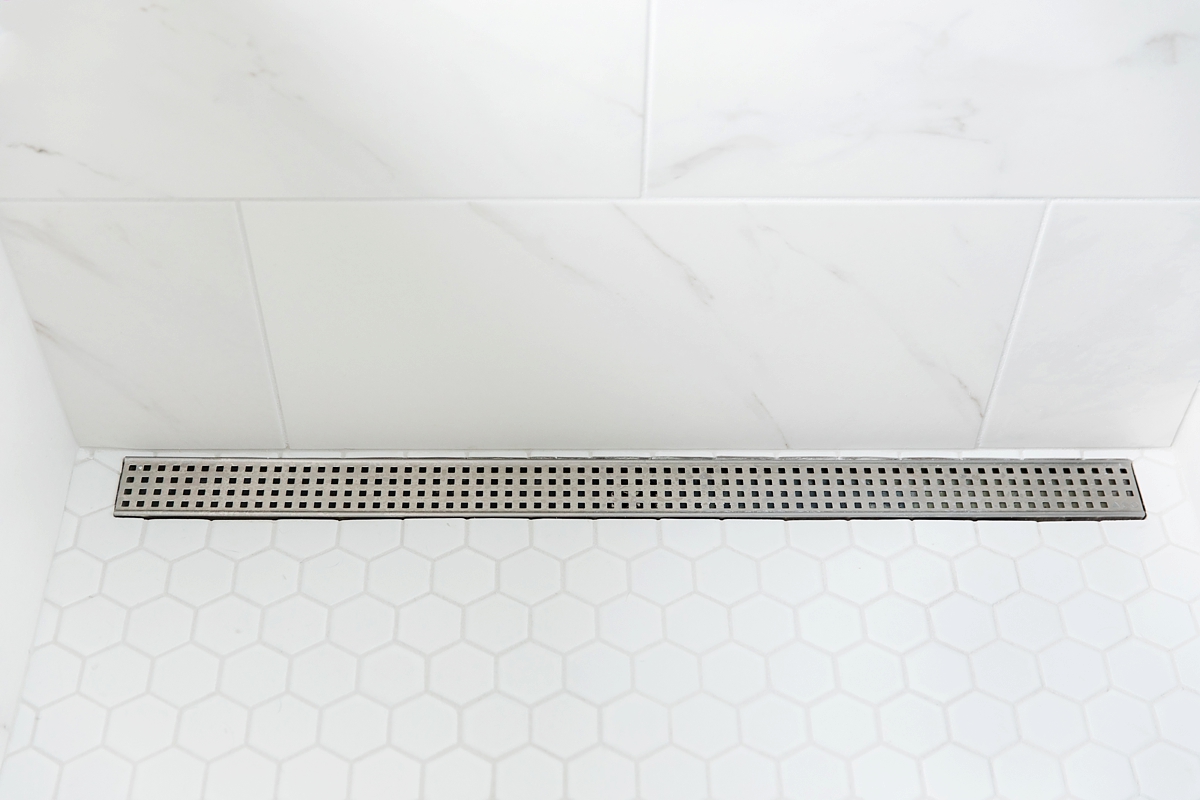
I love this drain! It’s so sleek and drains so fast! The grate on top also catches hair and prevents it from going down the drain. #winwin

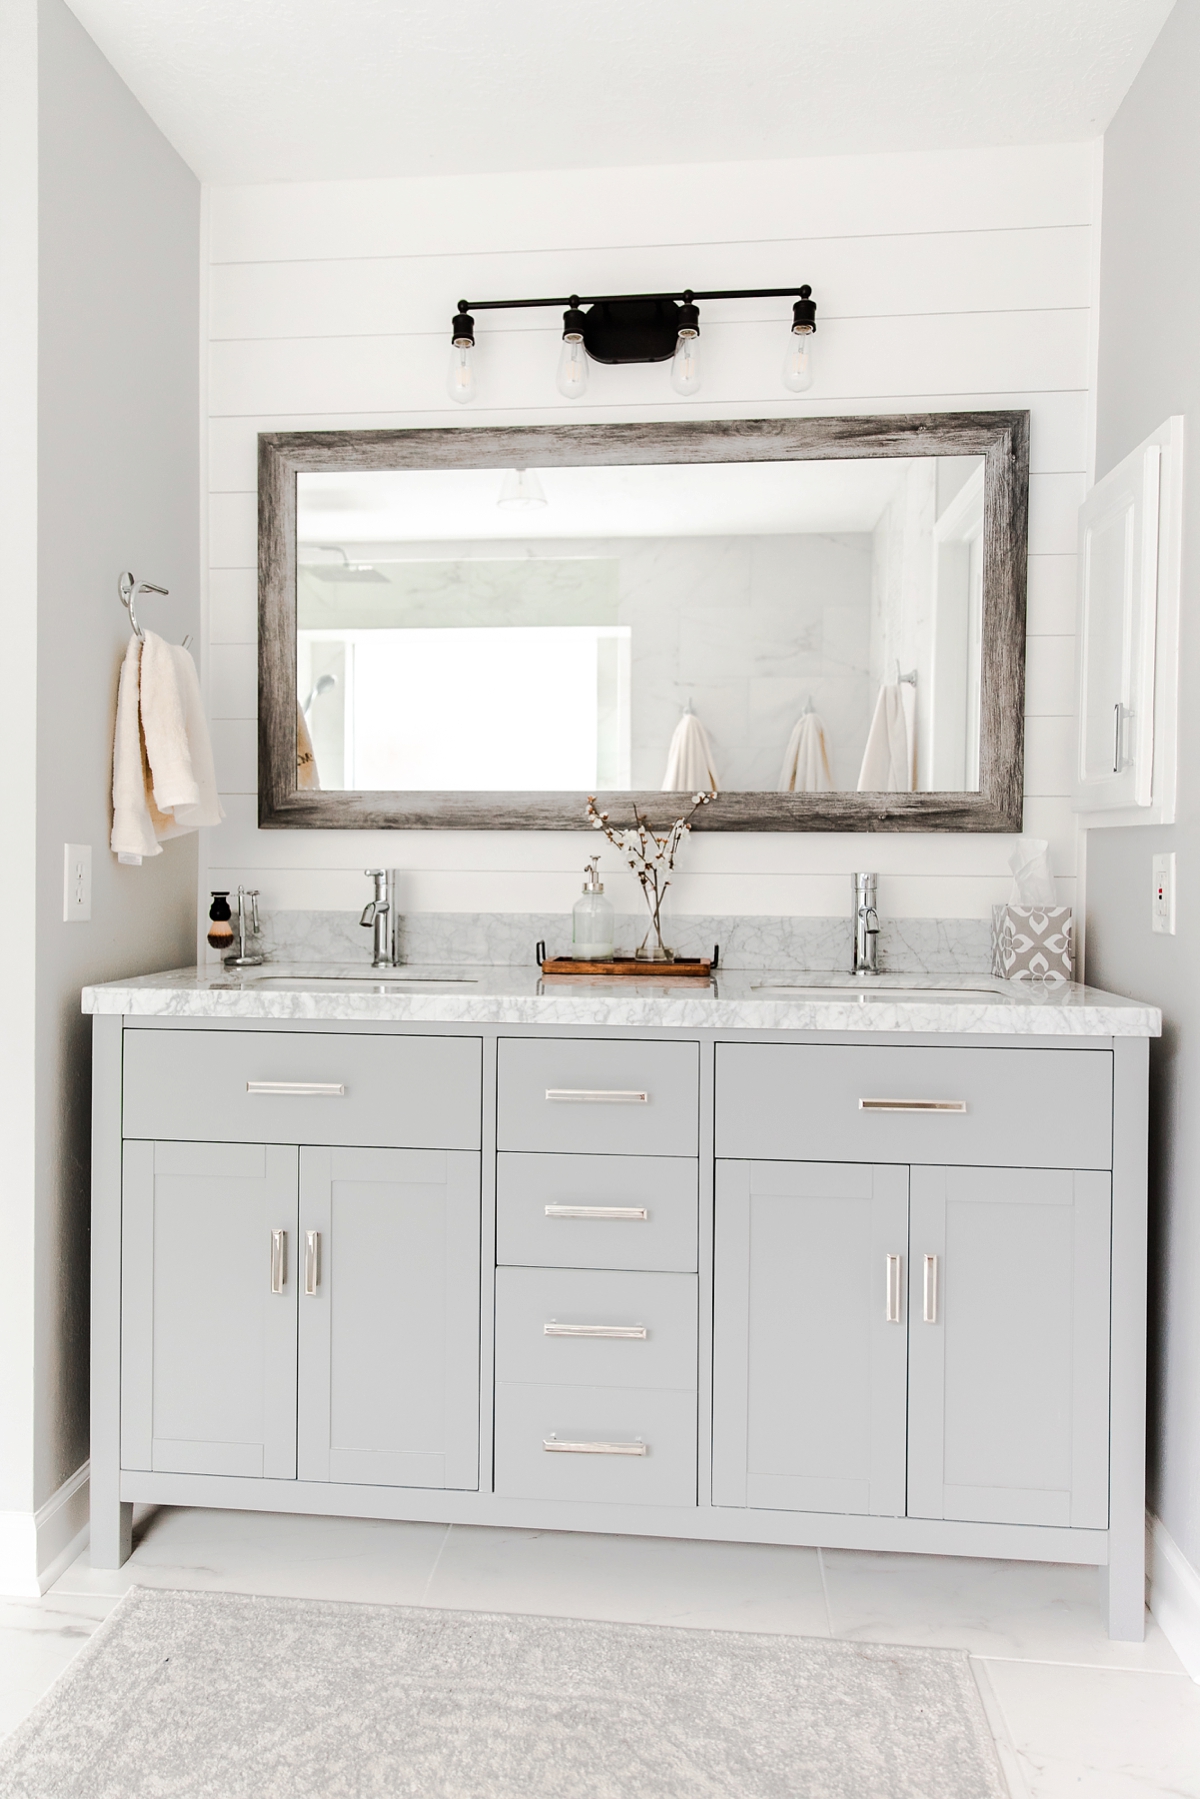
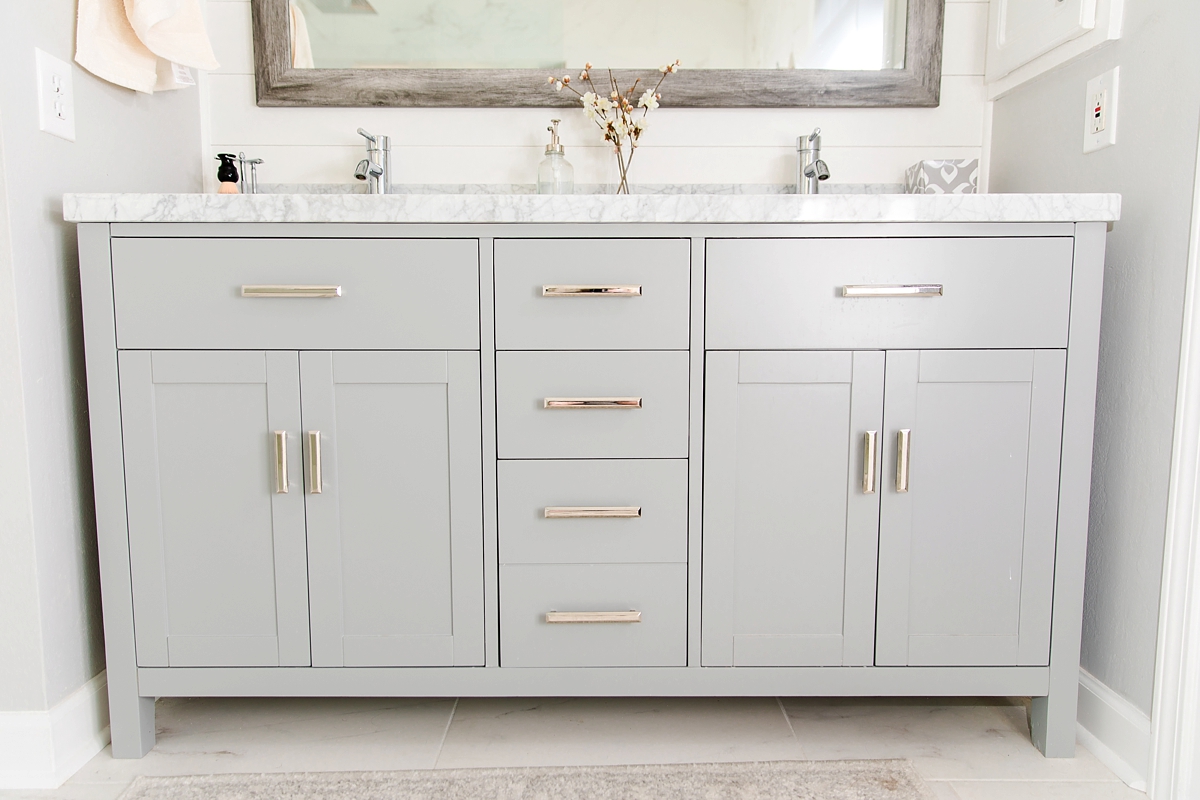
I love our new vanity area! The shiplap on the wall was Michael’s idea! When we were shopping for a new light fixture, we were both shopping on our phones and showed each other the same light fixture at the same time. Hah!
post date:

Our Bathroom Renovation – Before & After
You guys….. the bathroom renovation saga has FINALLY ended!! After a year and a half (that’s right…a year and a half) we finally finished our bathroom!! When we were touring our house for the first time, we loved so much about it but we hated the bathroom. We were standing in the bathroom with our realtor already discussing how much it would cost to renovate it. We knew when we bought the house that we would save up money and one day renovate the space. We lived with the original bathroom for two years and started making mental notes of what we wanted in our future, renovated bathroom. We ultimately decided to knock down the wall, take out the bathtub and shower stall and make a giant, walk in, spa inspired shower.
When we first started this project, we had no idea it would take as long as it did. There were so many things that slowed us down..hurricane Harvey, traveling, Michael working on the weekdays and shooting weddings with me on the weekends, the sheer size of the project and needing to research to learn how to do things…the list goes on!
I still can’t believe what we did and how much we have learned through this entire process. Here’s a quick breakdown:
- We knocked down the wall between the tub and shower.
- We gutted the bathroom to the studs and concrete floor. I don’t know what they used to put that tile down, but we just about destroyed the slab to remove the old tile.
- We moved the shower head from one side of the bathroom to the other.
- We did all our own plumbing! Michael raised the bathtub pipes higher for the new shower head and capped off the old shower head pipes.
- We moved the drain an inch or two closer to the wall so the linear drain would be centered in the shower.
- We built a curb out of 2×4’s anchored to the slab.
- We sloped the window shelf and the curb so water would drain off.
- We shaved down parts of the studs to make the wall perfectly flat (well, almost perfectly flat) for tile.
- We covered the walls in HardieBacker board. Whew! That was a lot of scoring and snapping.
- We made our own shower floor with deck mud and sloped it a quarter of an inch per foot. This was by far the most physical part of the entire process.
- We leveled using self-leveling compound and Ardex to flatten the floor and installed our own tile.
- We rerouted wires to make room for the his and hers shower niches.
- We covered all surfaces in the shower and curb with HydroBan to waterproof our shower.
- We installed a new toilet over ten times because it kept leaking. Turned out, the toilet was cracked on the bottom, and we had installed it correctly all along.
- We installed the new vanity and did all the plumbing ourselves!
- We installed new base boards and accidentally used unpaintable, silicone caulk. After several different attempts at scraping it off, we had to rip them up and redo all the baseboards and door trim.
- We saved a lot of money by using cut down plywood instead of real shiplap! When we installed them, a nail went through a water pipe, and we had to open the wall on the other side for emergency pipe surgery.
- We recut so many tiles that just broke out of line at the end of the cut.
- We did more math than I ever have in my entire life to make sure everything was just right.
- There are probably over a hundred things I’m leaving off because this project was SO big!
- We put blood, sweat and tears in this project and we couldn’t feel more proud of our hard work!
- We saved thousands of dollars by doing everything ourselves!
You might wonder, “How did you figure it all out?” Well, there were many useful resources. To name a few:
- johnbridge.com for tiling and shower building information
- terrylove.com for tips on plumbing
- youtube has so many helpful videos; it’s where Michael learned to sweat copper pipes, tile, grout and more.
- floorelf.com for more tile, linear drain, waterproofing, and niche-building how-tos
- Aaron Robichaud, a friend of Michael’s, who has made a successful living flipping houses – THANK YOU SO MUCH FOR ANSWERING ALL OF OUR MILLIONS OF QUESTIONS!
But now for the part you’ve all been waiting for. The before and after photos!!!
BEFORE
These are the photos by the seller from our house listing.
(These are our photos) Our bathroom had a shower, tub combo, The shower was tiny (and gross), and we never used the tub! It was just a lot of wasted space.
This shower. It was tiny, the shower head was way too low for Micheal and no matter how hard we scrubbed, the floor always looked like this.
We hated this vanity. It was really low and there was virtually no storage underneath because the doors were so narrow. Also, during demo, we discovered that the tile right in front of the vanity wasn’t even glued down. I literally just picked it up.
This tile was just all around horrible and was incredibly slippery! I slipped and fell several times just walking across the bathroom to the closet even while wearing shoes! It was very therapeutic smashing it up during demo!
AFTER
We are in LOVE with our new bathroom! Everything about it is just what we dreamed of. We took our nasty, twenty year old bathroom and turned it into a spa retreat! We love this room so much!
This marble accent tile stripe was Michael’s idea!
This corner under the window is where the bathtub used to be.
Michael chose the height of the shower head. He literally just held it above his head, and then marked the wall where he wanted it to go.
I love this drain! It’s so sleek and drains so fast! The grate on top also catches hair and prevents it from going down the drain. #winwin
I love our new vanity area! The shiplap on the wall was Michael’s idea! When we were shopping for a new light fixture, we were both shopping on our phones and showed each other the same light fixture at the same time. Hah!
weddings
engagement
bridals
personal
education

- Joanna
thanks for reading!
sort by
category
weddings
engagement
bridals
personal
education


Copyright 2026 Joanna Krueger

Great blog! I loved seeing the transformation of your bathroom. The before and after photos really highlight the incredible changes. Your design choices are inspiring and showcase how a renovation can completely revitalize a space. Thanks for sharing your journey!
I realize this is an older post, but I’m just coming across it now and love your design choices! Do you know the brand/type of tile you used in the shower? I love it! Thank you!
Hey there!! The shower tile was purchased from Home Depot a few years ago and unfortunately, it looks like it’s no longer being sold. The brand was “Marazzi” and it was a porcelain tile in a large format, 12×24 size. The accent tile in the shower niches was purchased from The Tile Shop and is a polished marble hex tile. We could not remember the name brand. I hope this helps! 🙂
Love your rug…it’s all beautiful . where did it come from?
Thank you! The rug is from Joss & Main!
Stunning! Amazing job… the feel of your new bathroom is so inviting and definitely spa like. #bathroomgoals #whenibuyahouse
So beautiful! I’m super jealous of your bathroom… #housegoals #whenibuyahouse 🙂
WOW! What a change! I know what post to reference when I need inspiration for renovating our own bathroom! 🙂 Congratulations on the 1.5 years of work paying off! The result is gorgeous!
Wow, I love it!! So beautiful! I love makeover posts, this is a great one! My hubby redid our master bathroom a few years ago, and it’s amazing how big a difference it makes! And I love how you and your hubby picked out the exact same light fixture, lol .
Wow! It looks like you put in a ton of work but it came out so stunning!
Obsessing over this bath reno!
It’s beautiful, Joanna!! Y’all did a great job! Seriously. Especially for DIY-ing everything. 🙂
Wow!! Amazing!!! These images are gorgeous. So lucky!! Please come and do my house next! ????????♀️
No way!!! I am so jealous!!!! How amazing is this?!
Wow! Looks great
Beautiful!!!! Great job. Love your paint color 🙂
Thank you!!
It looks amazing! I’m such a sucker for before and after a and remodeling posts!!! Xoxo
Thank you!! I am too!!
That’s a stunning transformation! I love how open and light it is.
Thank you!! That’s one of my favorite parts!!
LOVE! We’re about to add a bathroom in our basement and I’m totally going with this color scheme! love it!
Awesome!! We just love our bathroom!
How GORGEOUS!! Talk about Light and Airy dreams right here. Great work DIYing!!
Thank you!!
Wow!!! You guys did a fantastic job!! So beautiful!
Thank you!!
Seriously this is perfect!!!
Thank you!!!
Your new spa bathroom is just beautiful! Lots of hard work to be really proud of!
Thank you!!